In this article, we’ll show you how to create Web 3D content using the AI coding agent “Codex.”
AI coding agents like Codex have the potential to fundamentally transform not just implementation, but the entire workflow—including review, revision, and documentation.
Let’s experience its true capabilities through this article.
1. Introduction
This is Yoshinaga from the Data Integration and Development Division. Recently, AI agents have been gaining attention as a way to automate tasks. Setting up environments, writing code, fixing code, reviewing changes, and discussing implementation plans are all starting to become things we can hand off to AI through a chat-like workflow.
At the same time, AI tools from many companies are evolving so quickly that I honestly have not been able to keep up with all of them. In my personal development work, I have mainly been using GitHub Copilot. However, since its pricing structure is changing from June 2026, I decided this would be a good opportunity to try other AI coding environments.
This time, I tried OpenAI Codex, which became a hot topic around the release of GPT-5.5 in April 2026. The goal was to create 3D content with Three.js that runs in a browser and on a VR headset, specifically Meta Quest. The important point is that I did not write a single line of implementation code myself. I left the implementation itself to AI.
For the theme, I chose the solar system. A solar system demo is a good 3D programming topic because it involves both rotation around an object’s own axis and orbiting around another point. I often use it as a teaching topic for students learning 3D programming, and also as a benchmark for evaluating AI tools.
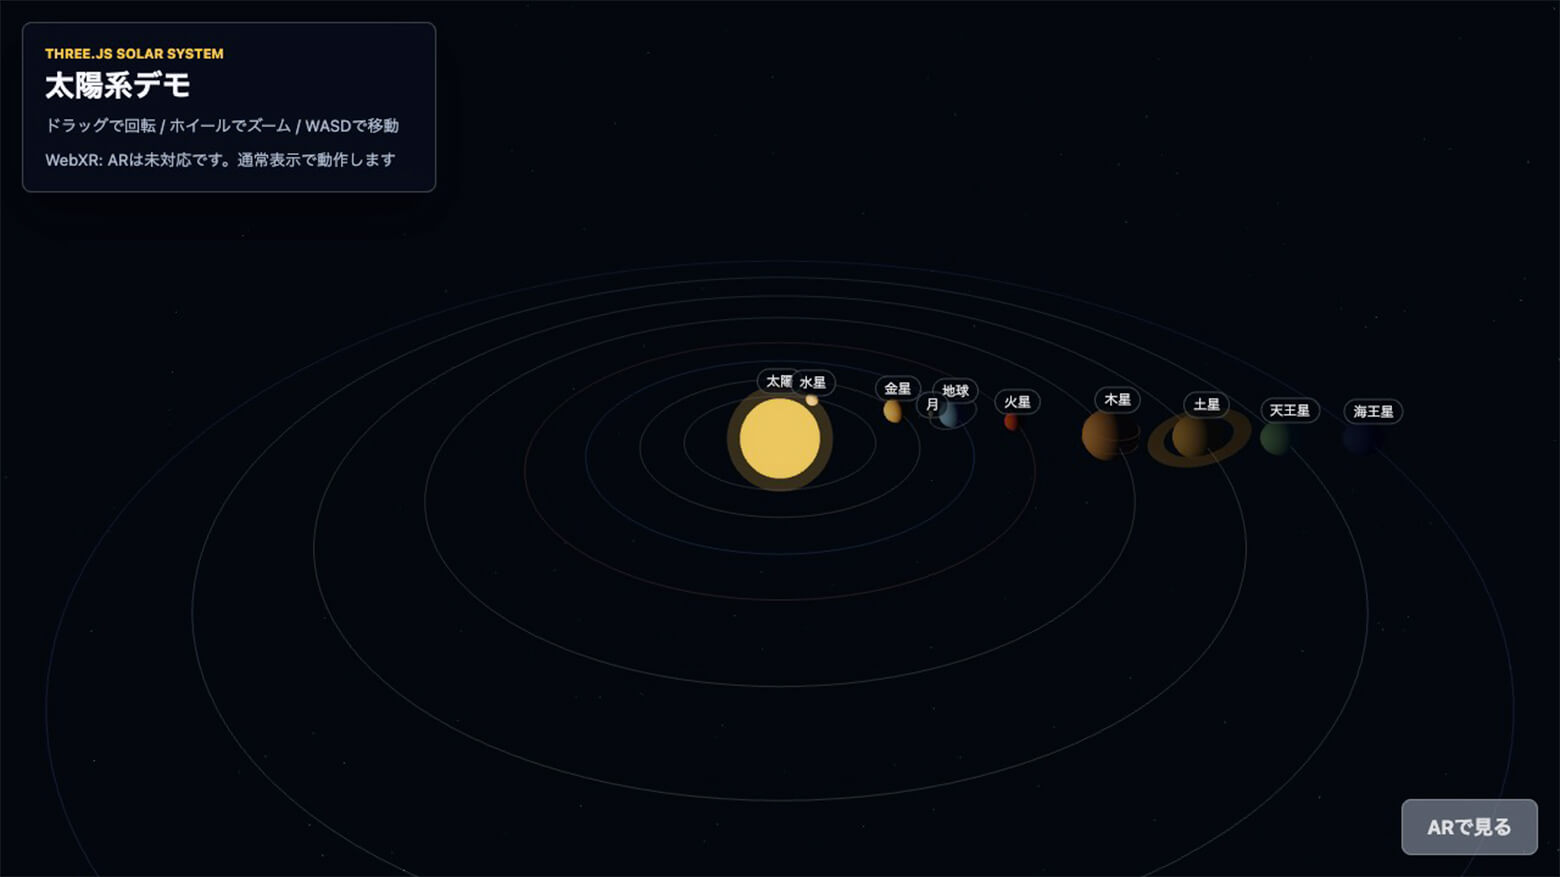
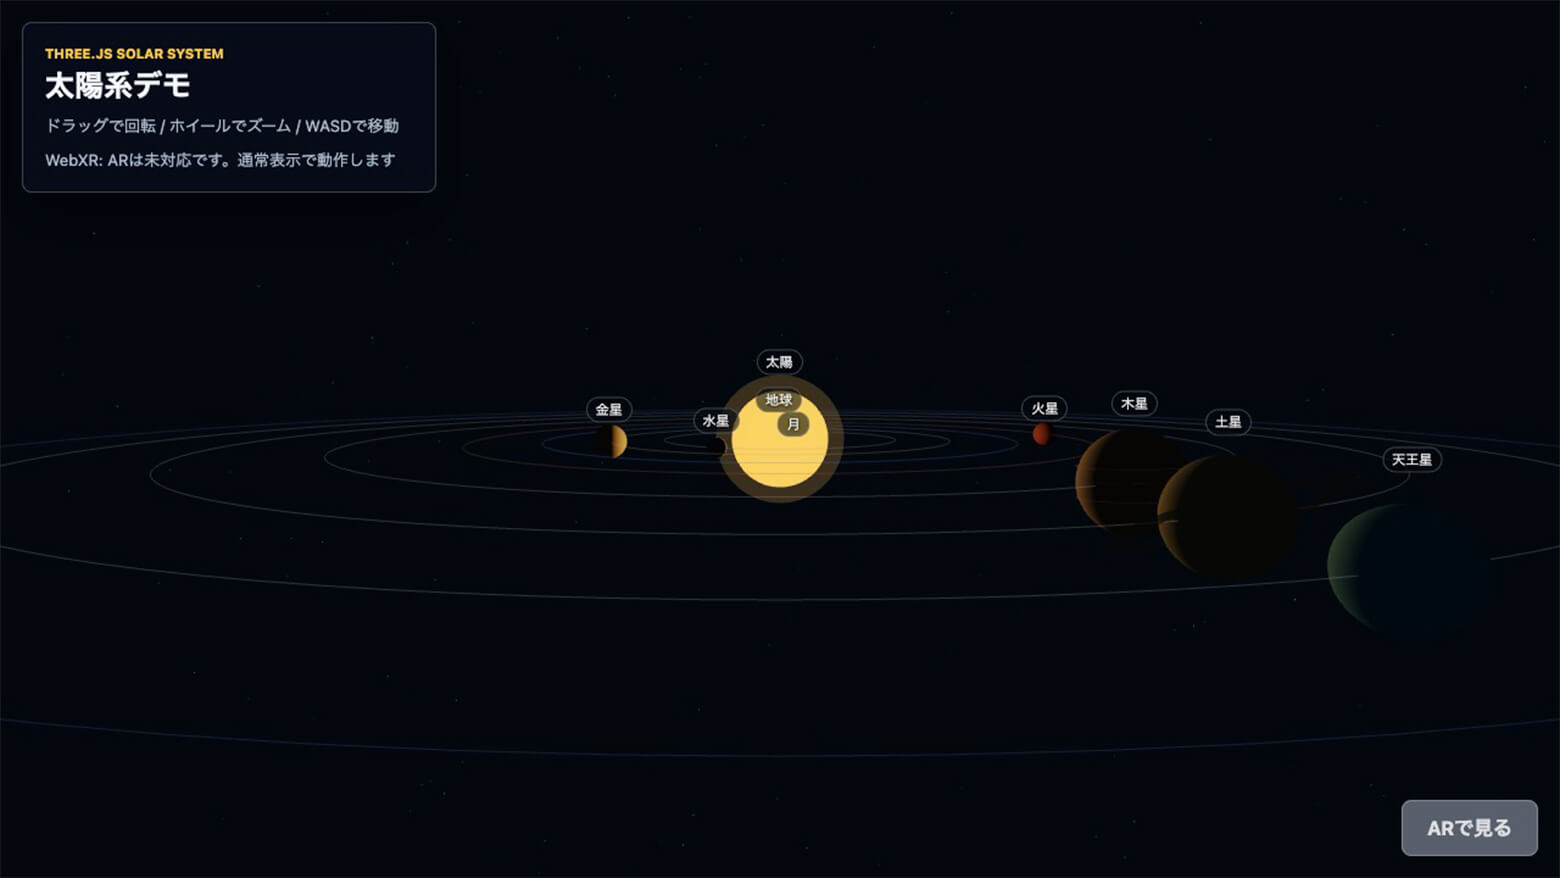
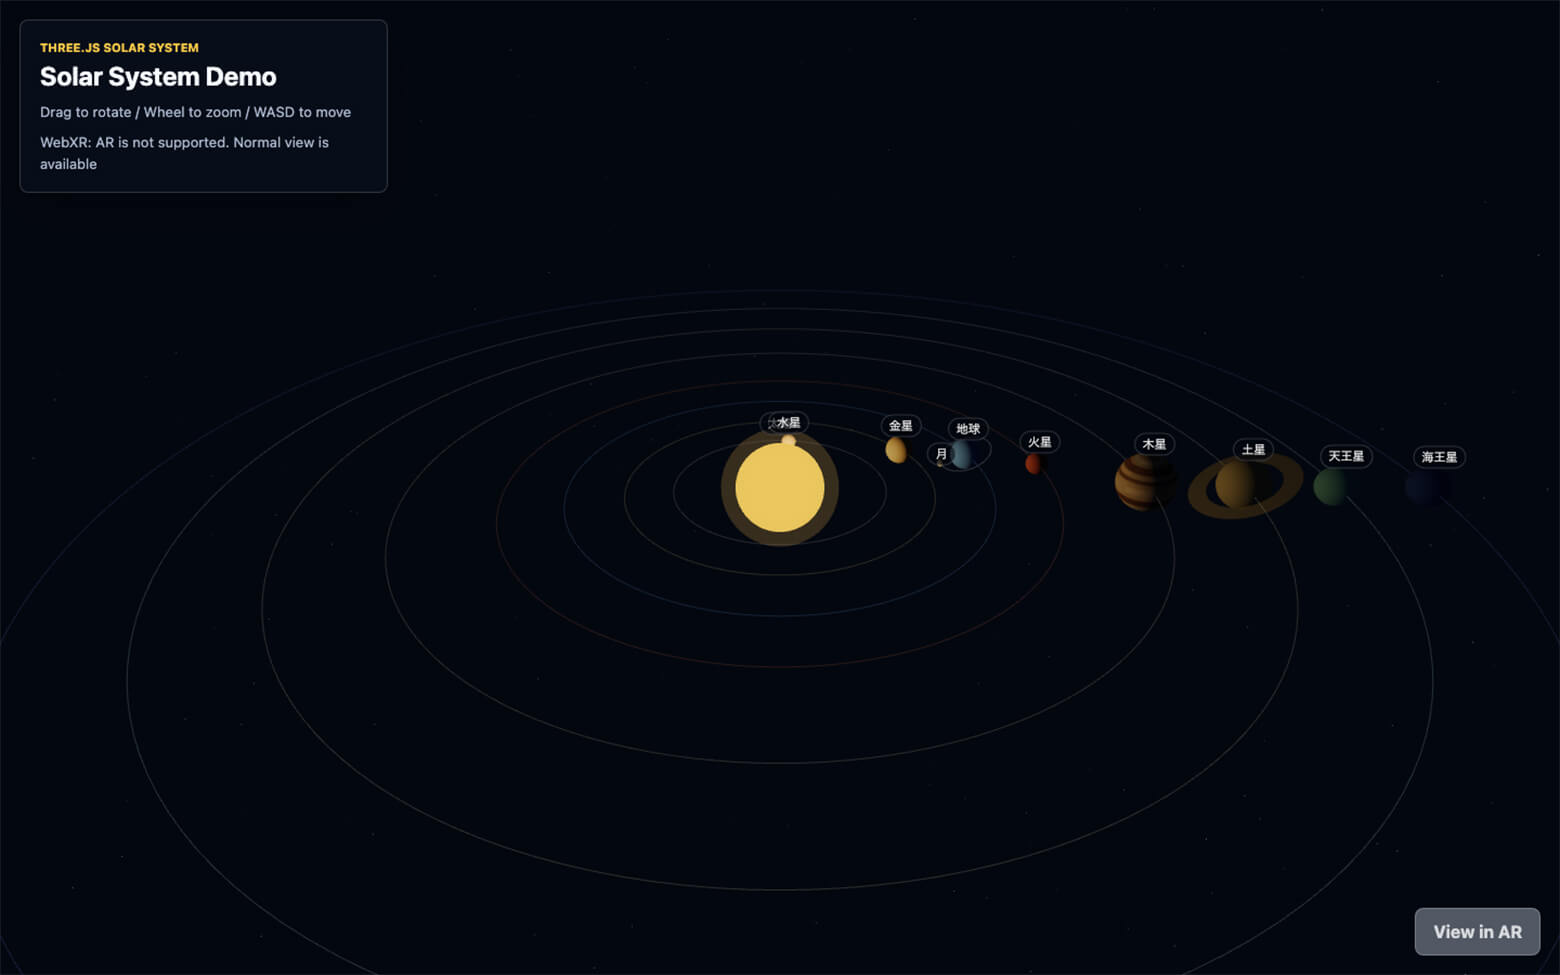
When complete, the demo looks like this in a web browser.
You can also try it on a PC or smartphone here: [Link]
2. What Is Codex?
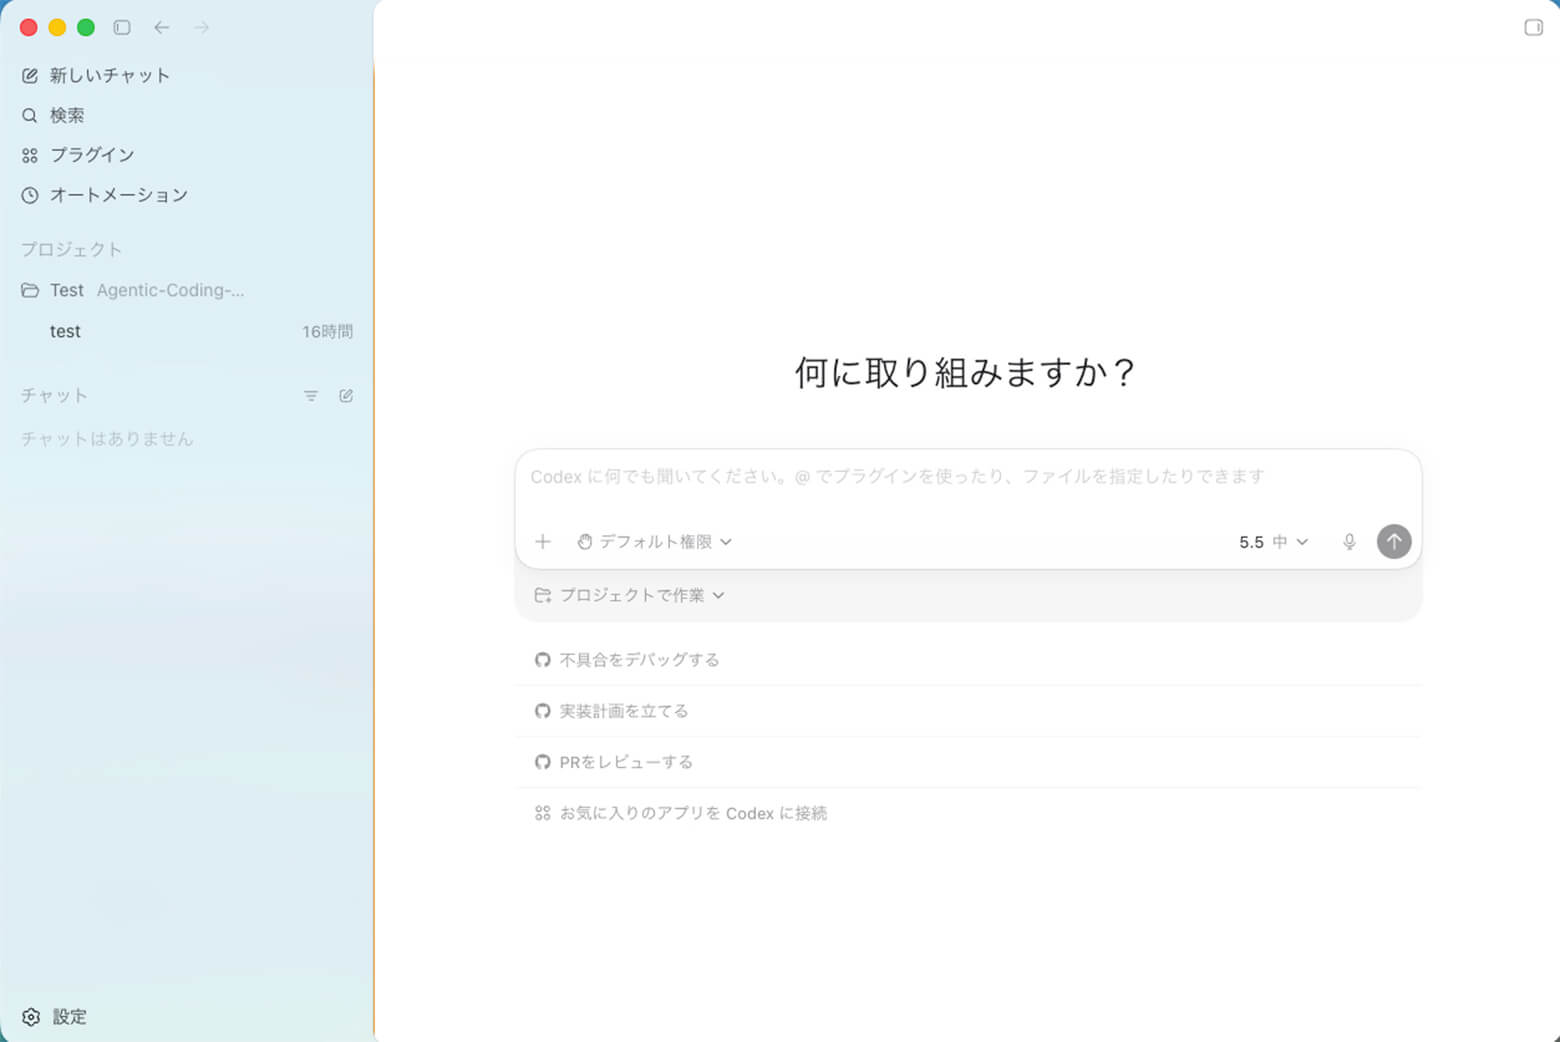
Codex is an AI coding agent. For example, you can use it to ask how to implement a specification, have it read and modify an existing project, or let it proceed while running commands and tests as needed. Codex can be used through an app, CLI, and cloud environment. In this experiment, I used the Codex app, operated through a GUI on my PC.
The basic usage is simple. Open Codex and type what you want to do into the prompt field. If you already have a working folder, such as an existing development project, you can specify that folder so Codex knows what it should work with.
One thing to check when using Codex is the permission mode. The modes can be understood roughly as follows.
Default permissions:
This is the standard setting that lets Codex handle normal tasks to some extent. It can read and edit files inside the working folder and run commands, but it asks for confirmation when touching files outside the working folder or using the network.
Auto-review:
This setting reduces waiting for human confirmation by letting an automatic review model evaluate operations that would otherwise need approval. Low-risk operations can proceed, while higher-risk operations may be rejected or stopped for confirmation when needed. As a result, it can reduce the number of interruptions compared with default permissions.
Full access:
This lets Codex operate over a much wider range. Because it can do more, it becomes more important to give clear instructions up front and carefully review what was run and what changed.
For this experiment, I chose the standard default permissions first and confirmed permissions when needed.
For the model, I used GPT-5.5 with a medium reasoning setting because the task itself was not extremely complex.
3. What Gets Built
As mentioned above, the project is a Three.js solar system demo that runs in a web browser. It is a simple demo-style piece of content, so the priority is making the structure easy to understand rather than using astronomically accurate scale.
The main elements are:
The Sun and major planets
The Moon orbiting Earth
Rotation and orbiting for each planet
Orbit periods based on relative values compared with Earth
Orbit lines, a star background, and a glowing Sun
Planet name labels
Camera controls using mouse drag, wheel, and WASD
A button to enter AR mode in WebXR-compatible environments
4. Runtime Environment
For PC-based testing, I used the web browser provided by Codex. In this experiment, I prioritized letting Codex implement and verify the content, rather than spending time setting up a detailed local environment by hand.
On the other hand, when testing WebXR on Meta Quest, an HTTPS connection is required. Therefore, I uploaded the generated files to my own web server and opened them from the Quest browser.
5. Discussing the Solar System Design in Plan Mode Before Implementation
Before asking Codex to implement the demo right away, I first organized the approach using something like Plan Mode.
The topics I discussed included the implementation approach, file structure, solar system data design, camera controls, WebXR support, verification workflow, and expected risks.
The development specification I gave at that point was as follows.
1. Solar System Demo to Implement
Create a Three.js solar system demo that runs in a web browser.
Keep it as a simple demo-style piece of content.
Planet sizes and distances do not need to be accurate.
Make orbit periods relatively close to real values, using Earth as the baseline.
Display the Sun and major planets.
Also display the Moon around Earth.
Represent both rotation and orbiting.
Manage planet data using arrays or objects.
Add orbit lines, a star background, and a glowing Sun effect.
Display planet name labels.
Make it look good without relying on external image textures.
Keep performance reasonably light.
Prevent planets near the Sun from being overexposed.
Because this should also be useful for learning Three.js, implement it only with HTML, CSS, and plain JavaScript, without build tools.
Make it runnable through a local server without requiring an npm environment.
2. Interaction Requirements
Rotate the view with mouse drag or the Quest controller.
Zoom with the mouse wheel or pinch.
Move the camera with WASD.
Show a simple on-screen operation guide.
3. WebXR / Meta Quest Support
When accessed from the Meta Quest browser, allow switching to WebXR mode, especially AR mode, with a button.
In AR mode, initially place the Sun about 1 meter in front of the user.
Use a smaller initial scale in AR mode than in the normal view.
Allow the right controller thumbstick up/down input to change the solar system scale during AR.
If WebXR is not available, continue running in normal display mode and show a message instead of stopping with an error.
When these requirements are entered in Plan Mode, Codex proposes an implementation plan. After reviewing the plan, if there are no issues, clicking the button labeled “Yes, implement this plan” starts the implementation.
UI note: This Japanese UI capture shows Codex presenting the development plan and the button used to approve and start the implementation.
6. Letting Codex Implement It
Once implementation starts, Codex proceeds almost automatically: creating index.html, style.css, and main.js, writing the code using Three.js, checking for errors, and verifying the result in a browser. The main role of the human is to check what Codex is trying to do and grant permission when needed.
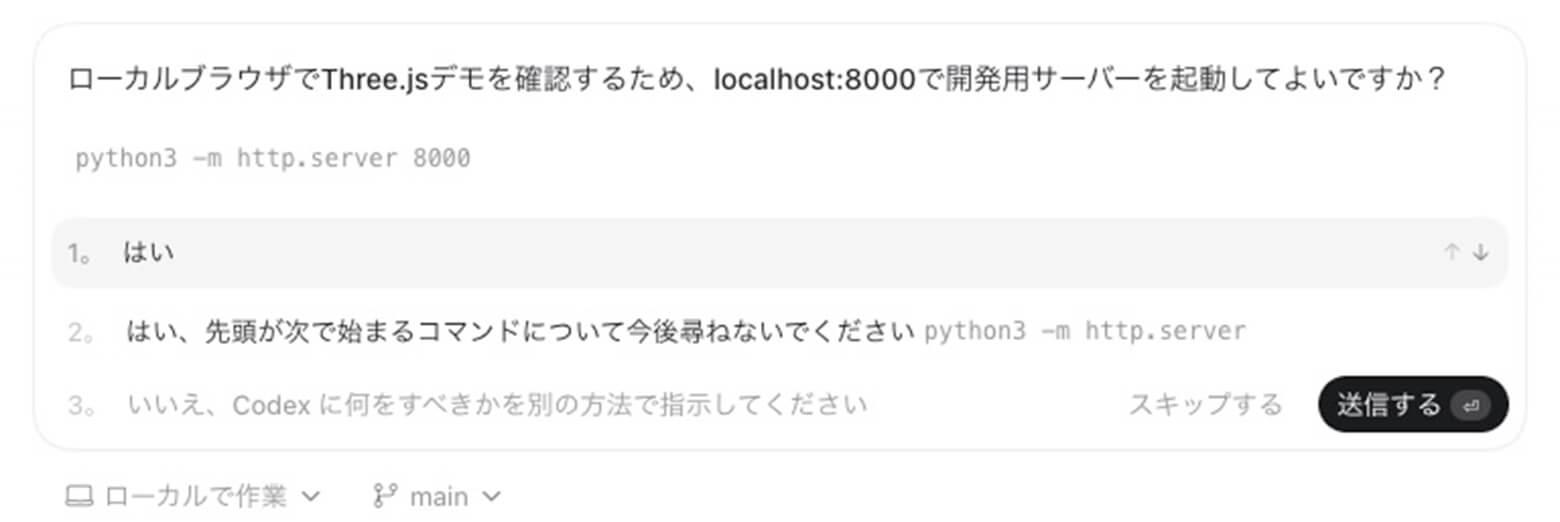
For example, when starting a local server or checking the result in a browser, permission confirmation may appear as shown below.
UI note: This Japanese confirmation dialog asks whether Codex may start a local server. The options are:
Yes
Yes, and do not ask again for commands starting with python3 -m http.server
No, tell Codex what to do differently
Based on the discussion above, Codex implemented the planet data as a single array and used it to generate planet meshes, orbit lines, and labels. This also makes the structure easy to use as Three.js learning material. If you are interested in the code details, see the GitHub repository.
The Moon was placed as a child object of Earth. This means that when Earth orbits around the Sun, the Moon moves together with Earth. At the same time, the Moon itself orbits Earth, allowing the demo to express nested motion: Earth orbiting the Sun and the Moon orbiting Earth.
7. Checking the Implemented Solar System Demo
After implementation, Codex started a local server and checked the display in its built-in browser.
The points checked were:
The Sun, planets, and Moon are displayed
The planets orbit around the Sun
The Moon orbits around Earth
Orbit lines and the star background are visible
Labels follow the planets
Drag rotation and zoom work
WASD moves both the camera and the target point
Even in a PC environment without WebXR support, the demo does not stop with an error and instead shows a message
In the first implementation, the visible sphere representing the Sun and the point light that actually emitted light were not aligned. However, Codex performed browser-based verification on its own, understood the issue from the result, and fixed the Sun visual and the light position before I had to give detailed correction instructions.
When I revisited it later, Jupiter’s band pattern still looked a little unnatural. The initial implementation tried to suggest stripes by placing ring-shaped meshes around the sphere, but depending on the angle, they looked more like separate rings overlapping the planet than patterns attached to Jupiter’s surface. So I gave Codex an additional instruction: “Jupiter’s pattern looks strange, so please make it cleaner.”
Instead of continuing with ring-shaped meshes, Codex changed the implementation to draw horizontal bands on a JavaScript canvas and use that as a THREE.CanvasTexture on the sphere material. In other words, it did not require an external image file. It generated a simple texture at runtime and applied it to the planet. This also fits the original requirement: make the demo look good without depending on external image textures.
The generated CanvasTexture for Jupiter looked like this.
By applying this texture to Jupiter’s sphere, the bands became part of the planet surface and were affected by the sphere’s lighting and shading. The result looked much more natural.
8. Checking on Meta Quest
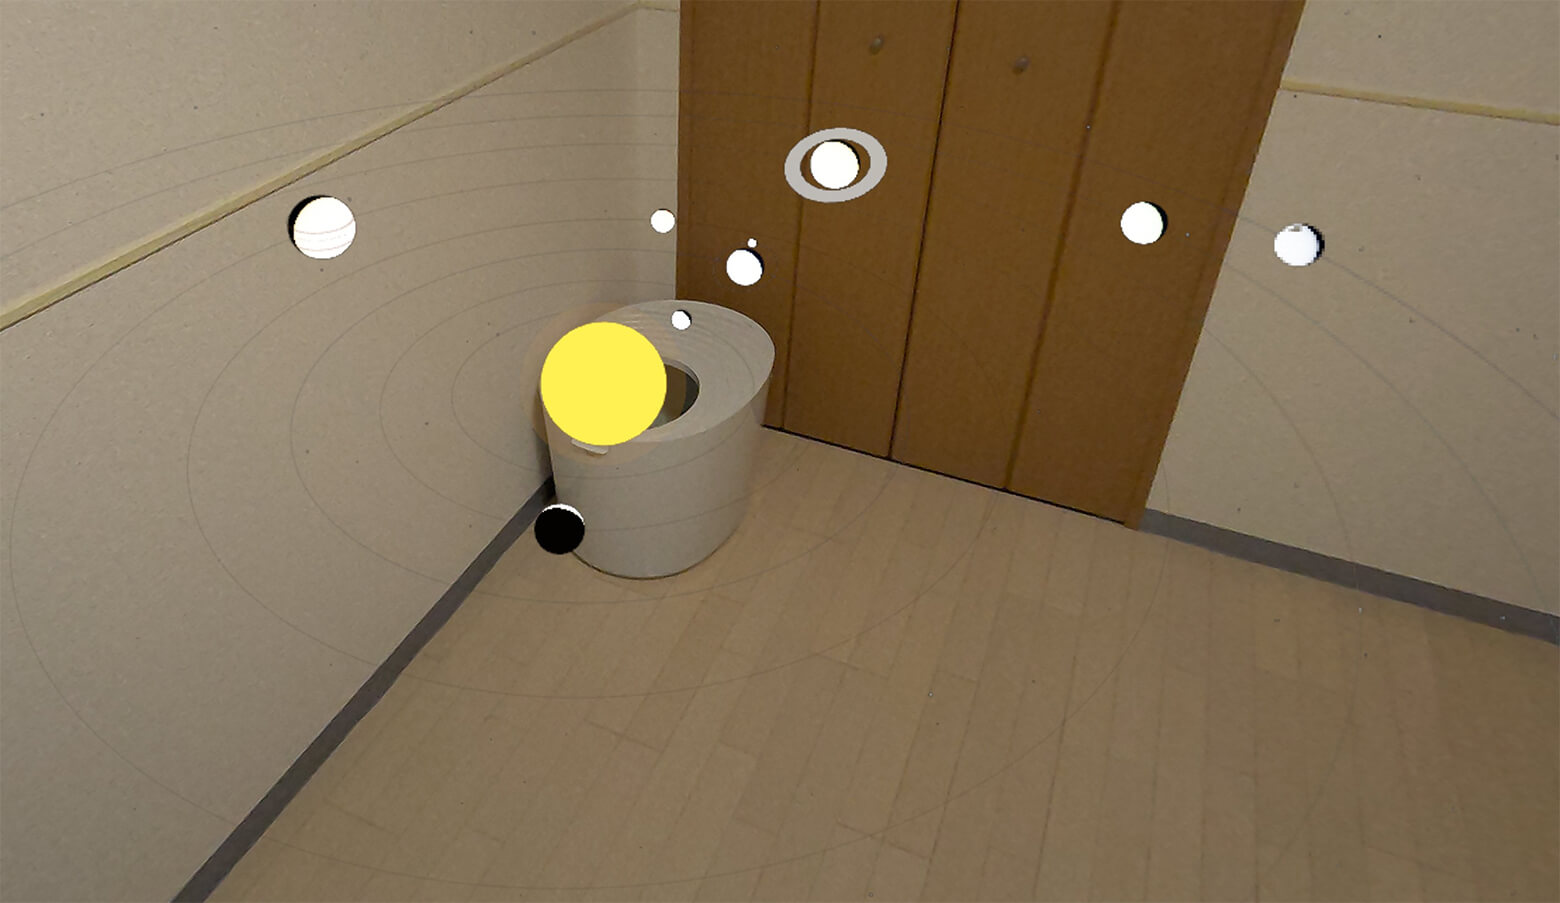
In the Meta Quest browser, an AR session starts from the “View in AR” button at the lower right of the screen. When entering AR mode, the whole solar system is placed so that the Sun appears about 1 meter in front of the user, and it is displayed at a smaller scale than in the normal browser view.
When I manually tested it on the actual device, the first AR output showed planets that were blown out on the bright side and too dark on the shadow side. As an experiment, I did not describe the problem in detail. I simply gave Codex a photo of the AR display and asked it to fix the issue.
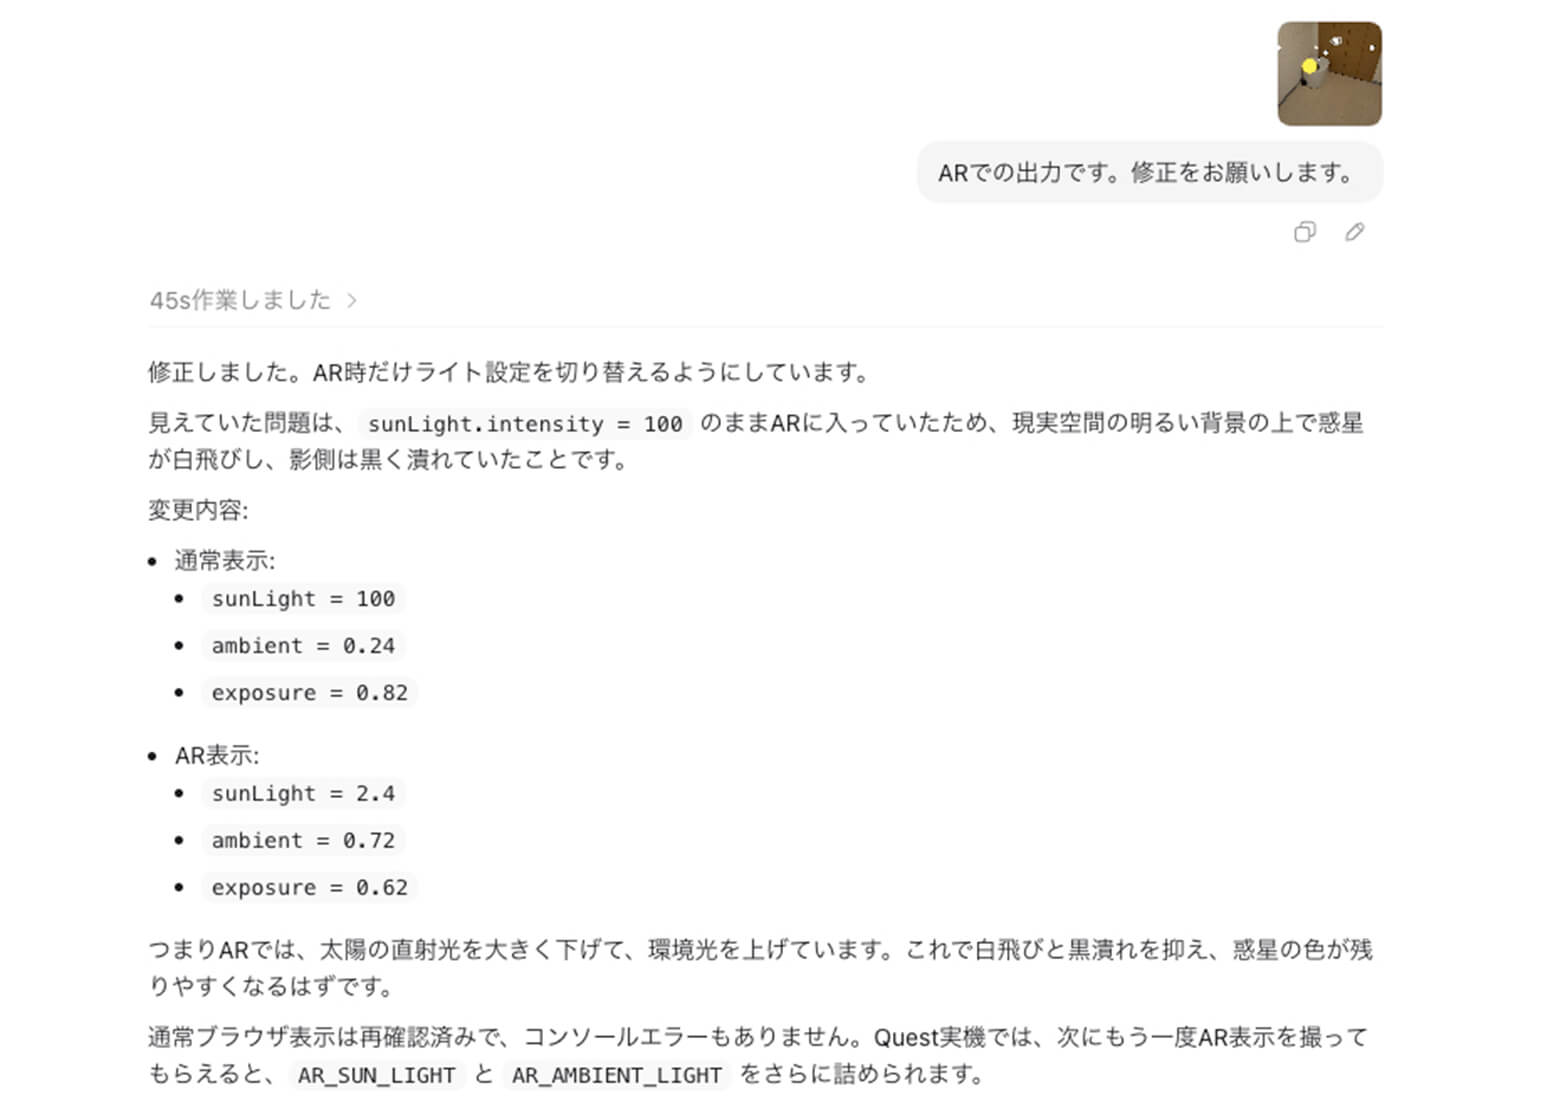
UI note: In this Japanese conversation capture, I provided the image and only instructed Codex, “This is the AR output. Please fix it.” The screenshot shows Codex’s response to that minimal instruction.
Codex inferred that in AR space, the real-world camera image was already bright, the point light was too strong, and the shadow side was getting too dark. It proposed separating the lighting settings between normal display and AR display. Specifically, it suggested weakening the Sun’s point light during AR, increasing ambient light, and lowering exposure slightly.
After the fix, the planet colors and shading became easier to see. This kind of workflow, where you give Codex an actual device screenshot and have it infer the visual problem, seems very compatible with 3D and AR tuning.
You can watch the demo running on Meta Quest in the following video.
9. What I Learned from This Experiment
Using Codex makes it easier to proceed through implementation, task breakdown, and verification planning as one continuous workflow.
What I especially liked was being able to organize the approach in advance using something like Plan Mode. In a task like this solar system demo, where rendering, interaction, and WebXR support are mixed together, breaking things down first reduces confusion. Taking a moment to express the design in words before implementation made the following implementation and verification much smoother.
Permission confirmations are not just interruptions. They are checkpoints for working safely. By checking what each permission request is for, you can control how much you hand off to the AI agent. I used default permissions this time, but once I get more comfortable, auto-review or full access may make it possible to hand off more and proceed more efficiently.
Another impressive point was that Codex did not only generate files or write code. It also autonomously checked the result in a browser, took screenshots, reviewed the result, and made necessary fixes. For the issue found on the actual Quest device, I did not need to explain the problem in detail. I only gave it a screenshot, and it inferred the cause and proposed lighting and exposure adjustments.
10. Summary
In this experiment, I tried using Codex while building a Three.js solar system demo.
Even with only HTML, CSS, and plain JavaScript, I was able to create 3D content that includes the Sun, planets, orbiting, rotation, a star background, labels, and a WebXR button. The resulting project also seems useful as Three.js learning material.
Codex was smooth to use not only for writing code, but also for design discussion, implementation, verification, and fixes. I can see it becoming a reliable partner for development work.
11. Actually, Codex Wrote This Article Too
Up to this point, I have written this as if it were simply an article about creating a Three.js solar system demo. In fact, this time I instructed Codex to develop the solar system demo and write the blog article at the same time.
The outline of those instructions was as follows:
I wanted to create a solar system demo with Three.js
I wanted to turn the creation process into a blog article
I wanted Codex to write the blog draft while developing the demo
If I pointed out bugs or requested fixes during implementation, I wanted those details and results reflected in the article
I wanted the first half of the article to read like a normal creation article, and reveal at the end that the article itself was also created with Codex
In other words, I did not ask Codex only to code. This was also an experiment in having it proceed with development work and article writing as one continuous process.
However, not every step was completed by AI alone. The following parts were done manually:
Added to the introduction
I added why I wanted to try Codex and why I chose the solar system as the topic.
Created screenshots
I manually prepared screenshots of Codex screens and execution results that Codex had not captured automatically. This could probably also be automated with better instructions.
Tested on Meta Quest
I checked the WebXR display on the actual device and shared the result with Codex.
Inserted links to YouTube, the web demo, and GitHub
Reviewed and adjusted the full article
I checked readability and facts, then added, removed, or revised wording as needed.
In short, I let Codex handle most of the work while filling in the smaller details manually.
In practice, I did not spend that much time actively working during the process. While Codex was implementing and drafting the article, I was spending a relaxing holiday with my cat, stepping in only when confirmation or instructions were needed.
For example, in the Jupiter appearance fix described in Chapter 7, Codex generated the Jupiter texture for the blog, then started the demo and captured screenshots of the result, and reflected them back into the article. What I did was mostly tell it that Jupiter’s pattern looked wrong and then check the final result.
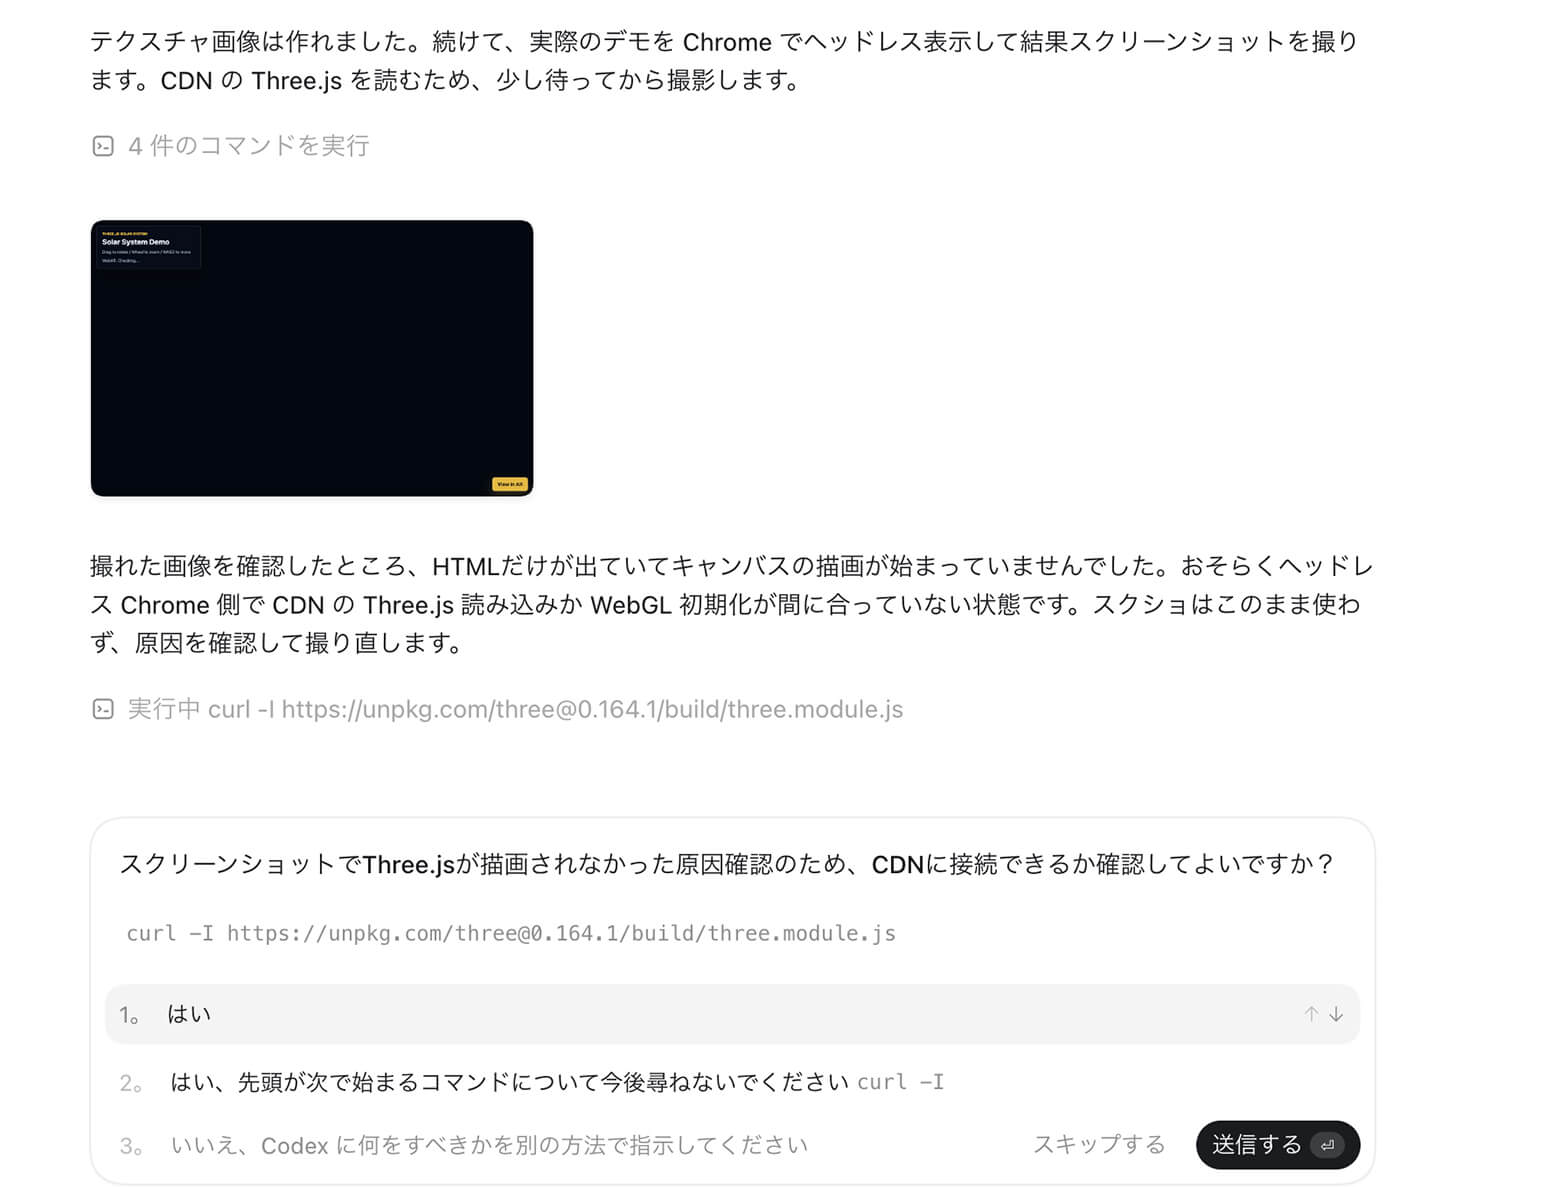
What was especially interesting was that Codex did not merely take screenshots. It also evaluated whether the captured image was suitable for the article. In the first capture, the Three.js scene had not finished rendering yet, so the solar system model I actually wanted to show was still missing. Codex did not adopt that image as the result. It recognized that the capture was inappropriate and then consulted me about how to retake it successfully.
What this shows: Codex did not blindly attach the first screenshot it produced. It checked the visual result, noticed that the 3D scene was missing, and proposed a better capture approach before updating the article.
In this way, AI agents such as Codex seem useful not only for development, but also for document writing and many other tasks. I am still just beginning to learn how to use them well, and I am not fully used to them yet. Even so, I feel that if I learn to use them effectively, they could make many everyday tasks more convenient and efficient.
Appendix: Prompt Used for This Experiment
In Plan Mode, I gave Codex the development requirements and writing requirements separately.
The development requirements specified the solar system demo, interactions, and WebXR / Meta Quest support. The writing requirements specified the intended reader, article structure, and what should be recorded in the article.
For the article, I especially wanted it to communicate not only the finished result, but also the process of discussing the plan with Codex, implementing it, verifying it, and turning it into an article.
The following is an article-friendly version of the writing requirements I gave Codex.
# Writing Requirements
You are a web frontend implementer and technical blog editor.
The goal is to help readers understand what makes OpenAI Codex interesting.
Implement a solar system demo that runs in a web browser using Three.js, and also summarize the creation process as a technical blog article.
The development requirements will be provided as a separate file. Read them and first organize both the implementation approach and article structure in Plan Mode.
This article should serve both as a creation article for the solar system demo and as a tutorial for development using Codex.
## Article Presentation
From the beginning to the middle of the article, make it read naturally as a 3D content creation tutorial for building a solar system demo with Three.js.
Do not reveal from the beginning that this is an experiment in having Codex write the blog article.
At the very end, reveal that the development and article writing were mostly automated with Codex.
Use many images in the article.
At the end of the article, include a formatted version of the prompt given to Codex.
## Content to Include in the Introduction
AI agent task automation has recently become a popular topic.
In April 2026, OpenAI Codex + GPT-5.5 became a topic of interest, and I decided to try it.
Briefly explain the basics of Codex, working folders, and permission modes.
This time, I will create a solar system demo that runs in a browser and on Meta Quest.
This is an experiment where I do not write the implementation code myself and instead leave the implementation to AI.
## Experiment Flow
Open Codex.
Specify the working folder.
Use Plan Mode to discuss the creation plan for the solar system demo.
Review the plan and proceed with implementation while granting permissions as needed.
After implementation, use the browser inside Codex for verification.
If screenshots or videos from Meta Quest are available, use them in the article.
If bugs are pointed out or fixes are requested during implementation, automatically reflect the details, results, and verified points in the blog article.
At the end, reveal that the development and article writing were mostly automated with Codex.
## Screenshot Handling
Use the provided screenshot for the Codex introduction section.
Display the implemented demo in Codex’s browser and use it in the article as needed.
Do not fabricate screens that Codex cannot capture automatically, such as Codex UI, permission dialogs, or actual Quest device screens.
Quest screenshots may be taken manually by the user when needed.
When referencing images in Markdown, use relative paths such as `Images/image-file-name`.
## Notes to Include in the Blog
Write that PC verification was performed using the browser inside Codex.
Write that when testing WebXR on Meta Quest, HTTPS is required, so the generated files were uploaded to my own web server.
Also mention that environments without WebXR support can still use the normal display mode.
## Important Notes
Do not write as if something was verified if it was not actually verified.
Do not write the user’s personal impressions or experiences without confirmation.
If a screenshot does not exist, leave a placeholder.
Do not fabricate screens that Codex cannot capture.
Do not reveal in the early or middle parts of the article that this is an experiment in automated blog writing.
Only make definitive statements about Quest verification results when screenshots, videos, or user-provided information are available.
Do not overpraise Codex; write both the useful points and the cautions.
At Avaxia Asia, we are looking for engineers to build the future together. If you’re interested, please don’t hesitate to get in touch.
Contact https://avaxia-asia.co.jp/en/contact/